
Composting methods
Compost can be made by different methods. The method of composting selected will depend on when finished compost is desired, the materials to be composted, and the space available for composting.
Wire mesh compost bins
These compost containers are multipurpose, cheap, and easy to build. Compost can be made in these containers with very little effort. As the organic material becomes available, it is simply placed in the container until the container is full. Except for wetting the compost regularly, no more effort is required. The compost will be ready for use within 6 months to 2 years.
If the compost needs to be ready sooner, it will have to be given more attention. The composting process can be sped up by following the practices:
- Shred the organic material into smaller pieces.
- Wet the compost regularly and keep the moisture content constant by covering the structure with plastic.
- Turn over the contents of the structure regularly.
To turn over the compost quickly and easily, the following steps can be taken:
- Untie the wire mesh framework at the joints.
- Remove the framework.
- Re-erect the structure right next to the compost heap.
- Place the material back into the structure from the top. The bottom layer of the heap will probably be composted already and may therefore be used in the garden.
Seen from the top, the structure may be round or pentagonal, but because the round structure is much cheaper and easier to erect, this method is recommended. The wire mesh to be used may be ordinary chicken wire or wire mesh. The ordinary chicken wire is much cheaper, but loses its shape and must be supported very sturdily on the sides. It can also be used only a few times and must then be replaced.
The measurements of the two structures are as follows:
Circular structure (Figure 1)
Diameter: 1,07 m
Circumference: 3,81 m wire mesh with a height of 0,9 m and mesh size of 25 mm or 12,5 mm
When using chicken wire, wooden pegs or steel poles must be driven evenly into the ground around the structure for support.
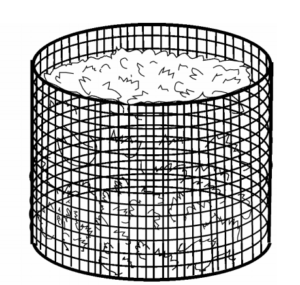
Figure 1: Round chicken-wire structure
Pentagonal structure (Figure 2)
Five panels of 0,9 m long and 0,6 m high of wire mesh with a mesh size of 12,5 mm are required.

Figure 2: Pentagonal chicken-wire structure
Construction
Round structure
(a) Chicken wire
Cut a 3,8 m length of wire from the roll. Fold the last 75 – 100 mm at each end in order to form sturdy ends for the joint. Now join the two ends firmly with binding wire. Place the circle in a suitable spot for making the compost. Drive 4 or 5 wooden pegs, evenly spread around the circumference of the circle, into the ground, making sure that the pegs are standing firmly, but still reach the top of the structure.
(b) Wire mesh
Cut the same length of wire as with the chicken wire, but cut the loose standing end of the wire with a pair of pliers to prevent injuries to persons. For additional safety, the ends are filed down smoothly. Bend the wire to form a circle and join with binding wire. This structure will be firm enough to stand on its own and pegs are therefore not necessary.
(c) Pentagonal (five-sided) structure
Cut 5 lengths of wire mesh from the roll, measuring 0,9 m high and 0,6 m wide, ensuring that the wire is cut in the middle of the eyelets in the mesh, leaving pieces of wire protruding at each side. The lengths of wire are then placed so that the loose wire ends tuck into the ground.
The five panels are then joined with binding wire, and the wire ends protruding at the top are bent with a pair of pliers or a hammer, to prevent the person placing material into the structure from being injured (Figure 3). The wire ends at the bottom ensure that the structure stands firmly.
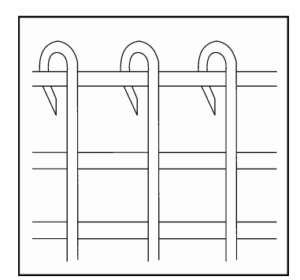
Figure 3: Indication of how wire-ends are bent over
Rotating drum composter
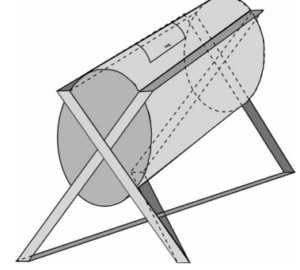
Figure 4: Rotating drum composter
Construction
- Obtain a 210-litre drum that does not contain chemicals or poisonous substances.
- Drill a 12,5-mm hole exactly in the centre of the top and bottom of the drum. The holes are drilled to accommodate the axle through the drum.
- Cut a door of about 500 x 250 mm into the side of the drum. Bolt hinges and a latch onto the drum and the door with zinc screws.
- Cut 4 planks of 1 340 mm in length for the side crosses.
- Cut 4 planks of 580 mm in length for the legs.
- Cut 2 planks of 600 mm in length for the bottom cross supports.
- The woodwork may be put together with wood screws.
- Place the drum, with a 12,5-mm steel axle through the centre, in the fork of the wooden structure. The axle should be long enough to protrude at least 150 mm on both sides of the drum.
Operation
Turn the drum into position with the door at the top. Fill the drum with organic material to the level where there will still be an air gap between the surface of the organic material and the top of the drum. This gap is necessary for storing reserve oxygen and to make it possible to wet the contents of the drum evenly.
As with all the other methods of composting, the organic material must be turned regularly for effective composting. The gap at the top of the drum assists in allowing the organic material to fall loosely in the drum during rotation. This will ensure that carbon dioxide that forms during the digestive process is replaced with oxygen, speeding up the composting process.
To prevent water added to the organic material from collecting on the bottom of the drum, a few holes must be drilled right across the circumference of the drum, for drainage of excess water. These holes will also help to provide the organic material with more oxygen.
To prevent rusting of the components of the composting structure, all metal surfaces must be painted with a rust resistant agent.
We thank the Agricultural Research Council (ARC) of South Africa for the material they provided for the readers of ProagriMedia. For more information visit their website www.arc.agric.za.